 |
 |

GENERAL DIRECTIONS FOR CHICKEN SCRATCHFABRICChicken Scratch is usually worked on gingham check in order to give it the lacy appearance which has made it so popular. Any of the woven or printed ginghams can be used for working Chicken Scratch. When working with most of the 1/8 inch and 1/16 inch ginghams, all that I have found are rectangles and not squares. Therefore, before starting your work, you must determine the square count per inch of your gingham. If you do not determine the count before you start, you may not cut enough material to Finish the design! With a ruler, count the number of squares in one inch of fabric from side to side, and then from top to bottom. On 1/8 inch checked gingham, you will usually find that you have eight checks from side to side (selvage to selvage) and seven checks from top to bottom. This will vary according to the size of the check of the gingham, and from manufacturer to manufacturer. Always measure to be safe! Once you have determined the number of checks per inch in the height and width of your fabric, then divide by the determined number into the stitch count of the design in order to determine the amount of fabric you need to cut. We generally recommend that you have eight (or sixteen) checks per inch for the width of the design. For example - the stitch count of the design that you want to work is 88 stitches wide and 77 stitches high. If you are going to work it on 1/8 inch check, and have turned the fabric so that you have 8 checks per inch in the width of the fabric, and 7 per inch in the height, then you would divide 88 (stitches wide) by 8 (checks per inch) = 11 inches of material needed for the width of the design, and then divide 77 (stitches high) by 7 (checks per inch) = 11 inches of material needed for the height of the design. Then you would add an appropriate amount (6 to 8 inches) for enough of a border for finishing. NOTE: If you are planning on incorporating the design into a garment or other sewn item, work the item first on a larger piece of fabric than is called for in the pattern, then cut it out with the design centered.HOOP/FRAMEWork all of the design using a wooden scroll frame or a plastic embroidery hoop with the fabric pulled taut. (Be careful when stretching the fabric in the hoop, as the thinner cotton blends will distort if pulled too tightly and leave a hoop mark.) Always wash your hands before starting work, and never eat while you are stitching to keep from having to deal with an unsightly hoop mark. You may protect it from a hoop mark by lining the top of the area to be worked with tissue paper and placing tissue paper and fabric in hoop. Stretch both, and then gently tear out the center of the paper, leaving it around the sides of the fabric and in the hoop. Remove hoop if you are going to leave the item unworried for more than a few hours.NEEDLEA #24 tapestry needle or a #7 or 8 crewel needle may be used. (I prefer the tapestry needle so as not to prick my finger!).FLOSSDMC Article 117 six strand embroidery floss is used throughout, except where specified, but you may use Susan Bates floss, or Coats and Clark floss, or any thread that gives you the proper weight needed for the size check on which you are working. On Guildford Gingham (an even weave) use two (or three strands). On 1/4 inch check use three strands, on 1/8 inch use two strands, and on '/16 inch use only one strand. For traditional Chicken Scratch" white is the floss color of choice for the filling stitches, with the outline stitch worked in the same color as the darkest check of the gingham you have chosen to work. (On blue ingham, use a darker blue, on red, a darker red, etc.). You may also reverse the colors for "Reverse Chicken Scratch"", or you may use the same color throughout, or mix the colors as you will.The outline is indicated on the chart by the symbol  . This is worked on the WHITE square of the gingham in the color indicated on the chart (the darkest
color of the gingham for traditional). The stitch used is a double cross stitch worked by forming an x and then working
a + over the top of the x . . This is worked on the WHITE square of the gingham in the color indicated on the chart (the darkest
color of the gingham for traditional). The stitch used is a double cross stitch worked by forming an x and then working
a + over the top of the x .
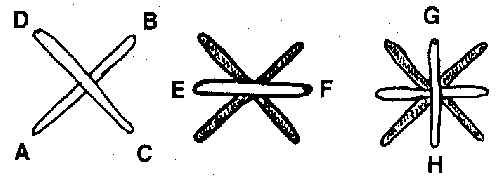 ILLUSTRATION 1Just be sure that all of the top stitches in the double cross stitch are worked in the same direction. On the larger gingham checks (1/4 inch) use two or three strands of floss, on 1/8 inch and 1/6 inch use two strands, and on the smallest, '/16 inch use one strand of floss. Work the entire outline of the design first, leaving the space between each of the outline stitches unworked. Begin the filling stitches with the symbol x. NOTE: The symbol x is also worked in the double cross stitch, but on the DARK square of the gingham inside the outline stitch. Work this in color floss indicated on the chart. (White for traditional.) Complete all of the inside double cross stitches. The symbols - and I are straight stitches which are worked in the direction indicated on the chart. It is worked on the MEDIUM colored square in the middle of the square. You may work all of the straight stitches by passing your needle over a medium square and under a white square, then back over the next medium square, and so on, in a running stitch. Complete all of the straight stitches using color indicated on chart (white for traditional). The symbol O is worked as a circle by weaving the needle underneath the four straight stitches. Come up from the back of the fabric in the same hole as one of the straight stitches (or just behind and to one side of the straight stitch) next to the white square. Then weave the needle underneath each of the straight stitches to form a circle. DO NOT pick up any of the fabric in the needle, just go under the floss of the straight stitches. You may either go around the circle twice, or you may double the amount of floss that you used for the outline and other filling stitches and only go around the circle one time. Try not to pull the circle too tightly, as you do not want to pucker 'the material. Work circles in color indicated on the chart (white for traditional). 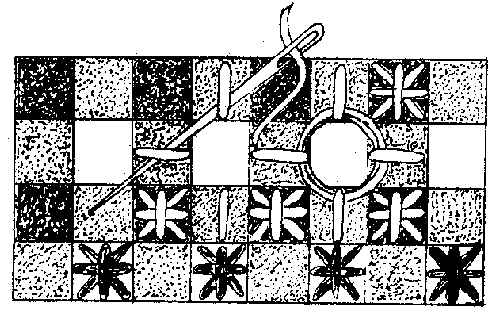 ILLUSTRATION 2COLOR INSERT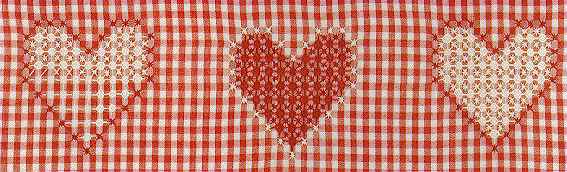 Summary: 1. Do all outline double cross stitches first on the white square of the gingham in color indicated on chart (a darker shade of the color gingham you are working on for traditional). Leave spaces blank between outline stitch on outside of design. (If outline stitch continues inside design, you may either leave blank or fill stitches in as you wish - it all depends on which way you like it!) 2. Do all inside double cross stitches next on dark square, in color indicated for the filling stitches (white for traditional). 3. Do all straight stitches on medium square in color indicated the for filling stitches (white for traditional). 4. Do all circles twice (or once with floss amount doubled) in color indicated for the filling stitches (white for traditional), going around white square. Below is a heart completely charted to work in Chicken Scratch . Work this piece as a practice piece. Refer back to this chart for working the interior design on other charts. This is the heart shown worked in the color strip located on the inside front cover. Chicken scratch. Can also be used as border on placemats, skirts, runners, aprons, tablecloths, and so on. It may also be used to completely cover a given area. 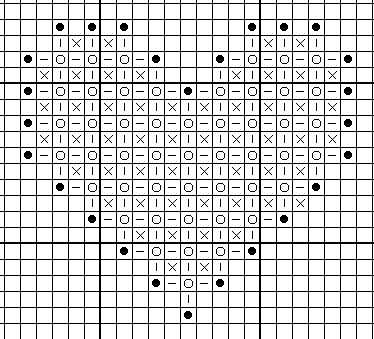 VARIATION ON A THEME - REVERSE CHICKEN SCRATCH TMTo work the Chicken Scratch with dark thread on the interior of the design to form the lace, using the same chart, work according to the following.1. Do outline double cross stitches on dark square using write floss. 2. Do an inside double cross stitches on white square, using dark floss. 3. Do all straight stitches on medium square with dark floss. 4. Do ad circles with dark floss around dark square. PLEASE SEE COLOR INSERT FINISHINGWash finished piece in lukewarm water with mild detergent, and iron with embroidery face down on a towel to dry. Finish as desired. |
Sign Up For Our Newsletter Below
..................................................................................................................................
|
Copyright © 1998 Pegasus Originals Inc. All rights reserved
Pegasus Originals Inc. 129 Minnie Fallaw Rd. Lexington, SC 29073-8226 USA Phone 803-755-1141 Fax 803-755-1438 Email us |